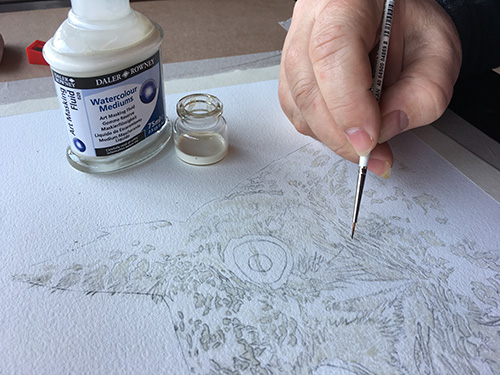
Tips on working with masking fluid
What makes watercolour such a challenging medium is that you can’t cover up mistakes as you can in other painting mediums. As watercolour is translucent and requires that you work from lightest to darkest values, it is extremely important to preserve your whites. In some cases, you can just paint around the shapes but when it comes to more complex or very small areas it becomes nearly impossible. This is where the masking fluid comes in. Essentially masking fluid is liquid latex which you can paint onto areas you want to preserve and protect from paint – and once it’s dry it can be peeled off, revealing the untouched whites below. It’s a bit like magic!
Masking fluid can be quite a difficult medium in itself and I’m sure many artists have given up on it, despite its usefulness. However, with a few tips, you can get past those difficulties and start building a long-lasting friendship with it. You will soon fall in love with the marks and effects you can create, and a whole new world of possibilities will open up with your watercolour paintings.
Plan ahead
Planning is probably the top, most important thing when it comes to watercolour as a whole. Carefully map out your painting before you start so you know exactly where the areas are that you want to preserve. It’s good to think of your masking fluid as white paint – so plan where you want the white ‘paint’ or highlighted areas to be.
Another very important thing before you get started with the masking fluid on your artwork is to test it on the paper you are planning to use it on. Not all papers are created equal and there is nothing worse than spending hours on a painting only to find the masking fluid tears the paper when you try to remove it, thereby ruining the painting.
Your favourite soapy
One of the frustrating things with masking fluid is that it dries pretty quickly and tends to clog up anything you use to apply it with. A jar of water with a bit of dishwashing liquid will soon become your best friend. By dipping your brush (or tool) in the soapy water and then lightly dabbing it on a kitchen towel to remove excess, it prevents the masking fluid from clinging to the brush/tool. You can regularly rinse the brush/tool off in the soapy water to get rid of the masking fluid that is starting to coagulate to keep the flow nice and smooth. Also, make sure to rinse your brush/tool off straight away and don’t leave it lying on the table or resting on a saucer as the masking fluid dries quickly and will soon clog it up.
Remember to throw away that soapy mixture and never use the same water to paint with. The tiniest amount of masking fluid in your paint water will make your paint dull as well as damage your good brushes.
Don’t shake things up
Don’t ever shake your bottle of masking fluid – it creates bubbles, and those bubbles dry quickly causing stringy, lumpy bits in your masking fluid. Remember that as soon as masking fluid meets air, it dries – so instead of leaving the bottle standing open, rather decant the required amount of masking fluid into a small jar or container and use it from there. Again bear in mind that ‘air + masking fluid = sticky mess’ so the larger the surface area of the jar or container the quicker a sticky film will develop on the surface. Therefore choosing something with a smaller surface area, that will still allow you to easily get your brush or tool in, is beneficial. A small lid from a spray bottle works quite well and holds a small amount of masking fluid without wasting it.
Create a stir – dilute it
Masking fluid can be too thick if used straight from the bottle so diluting it with water makes it much easier to work with. The more water you add the easier the masking fluid flows onto the paper which is very useful if you need nice fine lines or spattered areas. Don’t add too much water though as you can reduce the effectiveness of the masking fluid and even make it more difficult to remove as it tends to bind more with the paper. I have found that up to half/half still works for me but first rather test it on the paper you intend to use.
When adding the water, again, don’t shake it but rather stir it to mix it up using a toothpick or brush handle. You will notice that any stringy bits tend to catch onto the toothpick or brush handle which is useful to remove those, leaving you with a nice smooth masking fluid mixture.
The right tool for the job
Many tools can be used to apply masking fluid to the paper and it will depend on the effect that you wish to achieve. Some ideas range from a brush, dip pen, colour shapers, toothbrush, toothpick, stencil brush, even sponges or crumpled paper. Experiment with painting, drawing, dabbing or spattering the masking fluid onto the paper to create some very interesting effects. Bear in mind that masking fluid will destroy your brushes as it dries, so don’t use your good brushes.
Dry, dry and dry
There are three important ‘dry’ rules to remember when working with masking fluid. Firstly make sure the paper is completely dry before applying the masking fluid. If the paper is in any way damp, there is a chance that the masking fluid could penetrate the top layer of paper and cause it to tear when you remove it.
The second important ‘dry’ is to allow the masking fluid to dry completely before painting over it. To know if it is dry, touch it lightly with your finger and if it sticks to your finger in any way then leave it longer. Oh, just a side note – resist the urge to speed up the process with a hairdryer – the heat will cause the masking fluid to bond with the paper and make it impossible to remove without damaging the paper.
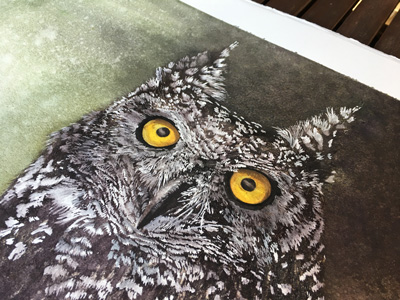
Removing the masking fluid is my all-time favourite part – its like magic. Here is where the third important ‘dry’ comes in – make sure both the paper and paint are dry before removing the masking fluid. If you touch the paper with the back of your fingers and it still feels slightly cold to the touch then its too damp – rather wait longer. Remember to be very gentle when removing the masking fluid to ensure you don’t damage the paper. You can use a soft rubber or just rub it with your fingertips to remove it. You can even build up a ball of old masking fluid which works like a charm to lift the masking fluid from the paper.
Another thing to be wary of is leaving masking fluid on your paper for extended periods. A few days should be fine but longer periods can get it to a point where it is impossible to remove without damaging the paper.
A soft touch
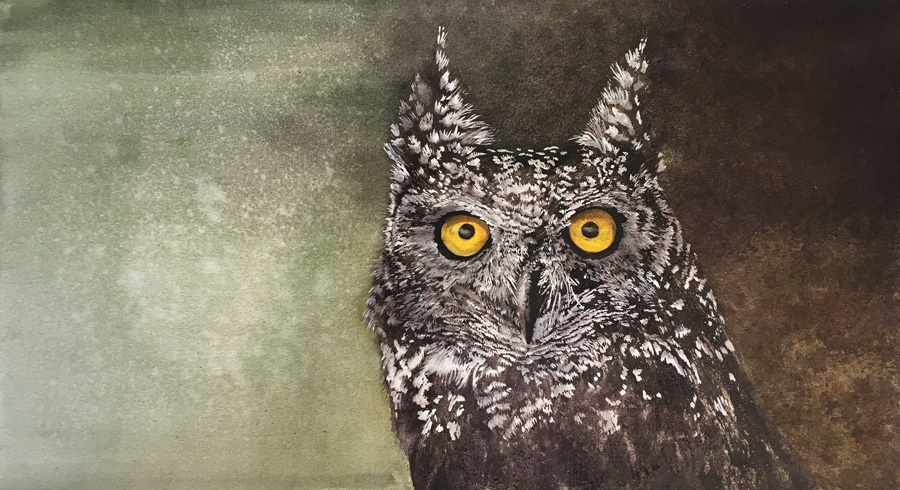
Masking fluid works so well that it can leave very hard unnatural edges around shapes. You can soften those, if need be, by using a brush and water to gently lift some of the colour on the edges. You can also go in with a bit of colour to just tone down the harshness of the white in areas where needed.
With these tips in mind, I’m sure you will find yourself starting a very long-lasting friendship with masking fluid. It is a magical medium which can certainly heighten the pleasure of watercolour when used correctly.
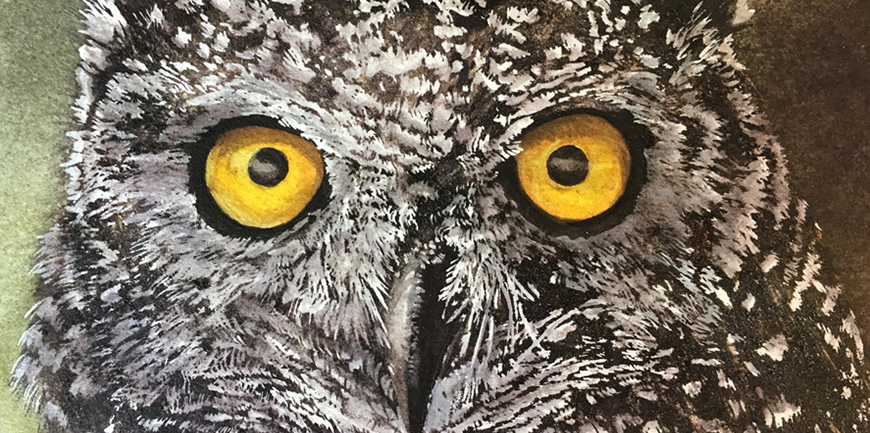
The artwork used in this post was created by the very talented Lindy Roux and demonstrates the beautiful effect that can be created using masking fluid.
-
 Art Masking Fluid – Winsor & NewtonR349.00
 -
Art Masking Liquid Pump Marker & Refill – MolotowR235.00 – R249.00
-
Art Masking Fluid – ZellenR95.00
-
Art Masking Fluid – Daler RowneyR229.00